
An Example Game
| Did you land here from an offsite link? If so then before you start reading below you might be interested in our recommendations on learning to play. |
The example game shown here is played on a 9 by 9 board, and illustrates most of the rules in action. It is a game played between two professionals. Try to see how the players use the threat of capture to develop their positions. Notice also how they try to connect their own stones, and separate those of the opponent.
Most games of Go start fairly peacefully, with each player loosely mapping out territory in different parts of the board. In this example on a small board, Black plays first in the centre. On a full size board, play usually starts in the corners near the handicap points.
|
You can
After you've played through the game go to the section on the end of the game below to see how counting happens. |
| The numbers in the figures show the order in which the stones are played. In later figures, stones which have already been played are not numbered. |
|
With 1 and 3 in Figure 1, Black exerts influence over the
right side of the board; while with 2 and 4, White lays claim
to the top left corner. With 5, Black aims to exclude White
from the bottom half of the board. White leans against the
lone Black stone with 6, reducing it to two liberties. With 7,
Black strengthens the stone at 5 by extending to 7, and now
this string has four liberties.
If Figure 2 seems somewhat alarming, you may find it easier to look back at Figure 1 and imagine adding the stones one at a time. Better still, play the game out on a board. |
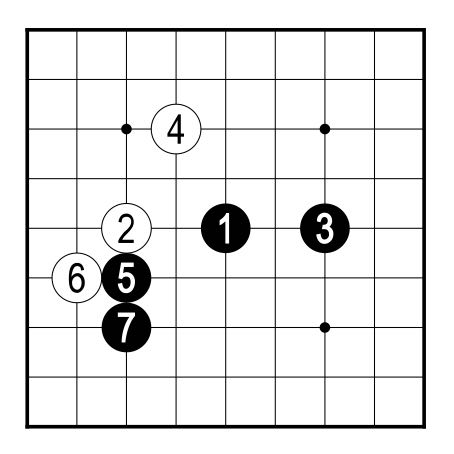 Figure 1 (1-7)
| |
|
After the 8 - 9 exchange, White pushes towards the bottom
with 10. Rather than defending the bottom left corner,
Black changes direction with 11, and now tries to fence off
the top right. Again White leans against the Black stone, and
again Black strengthens this stone by extending to 13.
White pushes into the gap with 14, and Black blocks at 15.
If Black succeeds in surrounding all of the area to the right and bottom of the board, Black will have more territory than White has in the top left. Accordingly, White cuts Black into two with 16, aiming to destroy the Black area at the bottom in the course of this attack. Note that the three Black stones to the left of 16 now have only two liberties. | 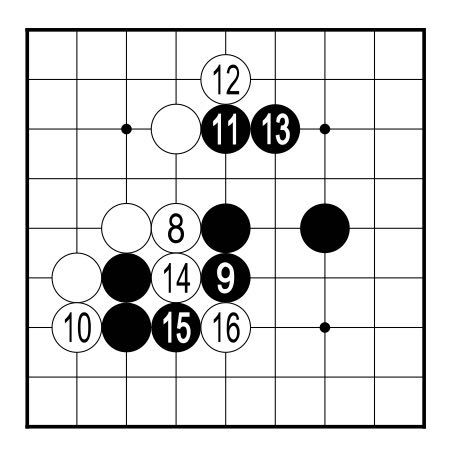 Figure 2 (8-16)
| |
|
Black must do something to avoid the imminent capture of
the three stones cut off by White 16. In Figure 3, Black 17
and 19 are both threats to capture White, who flees in turn
with 18 and 20 (can you see why 17 and 19 are threats?).
With 21, Black has stabilised these strings, and White's three
stones are trapped inside Black's sphere of influence.
The outcome of the game now hinges on the fate of these stones. If they die and White obtains no compensation, White will lose. If they live, or can be sacrificed in order to reduce Black's territory, White can still win the game. | 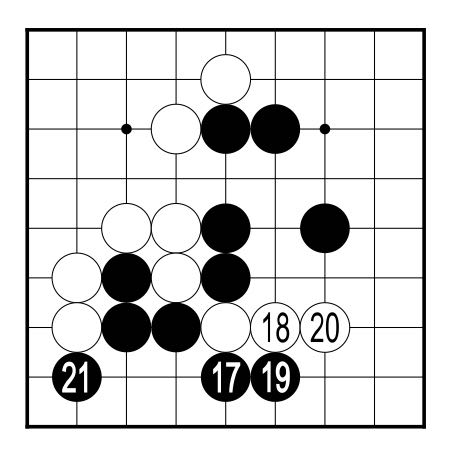 Figure 3 (17-21)
| |
|
White plays 22 in Figure 4 in an attempt to expand his
position along the edge and to reduce the liberties of the
Black stone at a. Black blocks at 23, preventing White from
forming a living shape along the second line. With 24,
White threatens to play at 25. Due to the presence of 22,
this play would simultaneously threaten the capture of the
Black stone at a, and of the two stones to the left of 25.
Since either of these captures would save the White stones
below, Black plays 25 himself, putting an end to any possibility
of the White stones' escape.
Unable to escape, and with insufficient space to be able to form two eyes, White plays 26 on the outside. White's plan is to sacrifice the stones on the right and in the process to destroy Black's prospective territory at the bottom. | 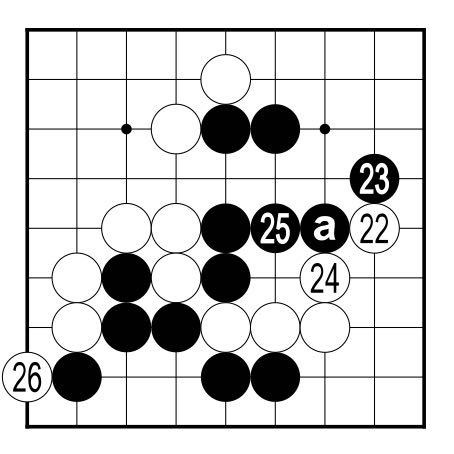 Figure 4 (22-26)
| |
|
Figure 5 shows White's plan put into effect. Black really
has no choice about 27. Black would like to defend the
stone to the right of 26, but if White gets the chance to
block at 27, Black's advantage in the fight will be lost.
White's plays at 28 and 30 are a device to increase the value
of the sacrifice; Black must play at 31 to prevent White
from getting an eye by playing there.
With 32 and 34, White captures Black 21. Now Black must capture the sacrificial White stones with 35, 37 and 39, while White creeps along the bottom with 36 and 38. Note that a play to the right of 38 is White's privilege. It is not urgent since Black cannot play there. Can you see why? |
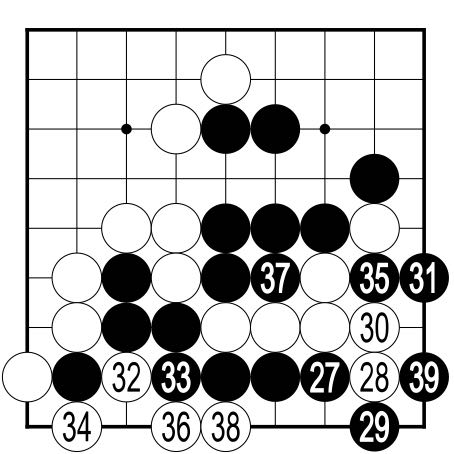 Figure 5 (27-39)
| |
With 39, the fight in this part of the board comes to an
end. Although White has lost 7 stones, White has captured
one of Black's and succeeded in destroying the bottom
area. White has even made a couple of points of territory in the
bottom left corner. Furthermore, it is still White's turn to
play, so is free to take the initiative elsewhere: to
expand White's own area or reduce Black's; to exploit
Black's weaknesses or to patch up White's own.
| ||
|
If your guess for White's next play was somewhere
near White 40 in Figure 6 you can congratulate
yourself. This is where the boundary between White's
territory and Black's is still most uncertain, and the
first to play here will make the greatest gain. White 40
removes White's only weakness, the possibility of a
Black cut at this point. It also prepares for White
to slide into the top right and destroy
prospective Black territory there.
With 41, Black blocks White's path, and 42 to 45 complete the boundary between the two territories here. The game is almost over. Can you see the best place for White to play next? |
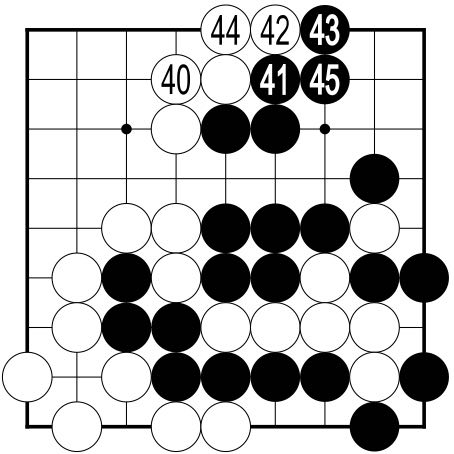 Figure 6 (40-45)
| |
|
White 46 in Figure 7 pushes into the one remaining
gap in Black's wall. 47 shuts White out, and 48
prevents the capture of 46. Strictly speaking the game
is over at this point, since there is nowhere that either
player can play to increase their own territory
or decrease their opponent's. Black would like to
play at 50, but if Black did so, the Black stones would
have only one liberty, and White would capture them
with a play to the right of 50.
Black 49 and 50 complete the formalities. After 49 and the removal of the 6 White stones, Black could play at 50. This would make the point to the right of 50 Black territory, so White plays at 50 to prevent a Black play there. |
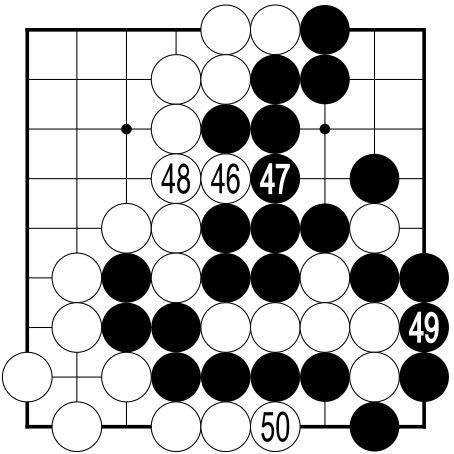 Figure 7 (46-50)
| |
| The first play in Figure 8 makes no difference to the score, but is played to clarify the situation, make counting easier and to avoid passing early. It is not necessary for Black to complete the capture of the White stone at a - White admits that it is hopeless. There is no point in either player playing inside the other's territory. Territory is so called precisely because it is an area which is secure against invasion. Any stone the opponent played inside it would be killed. Neither player could hope either to form a living string inside, or to escape from, the other's territory. Neither can the players hope to kill any of the opponent's stones. All their stones - except White's hopeless stone - are effectively connected, forming living strings with at least two eyes. Black passes, handing a stone to White. White then passes, handing a stone to Black, and the game is over. | 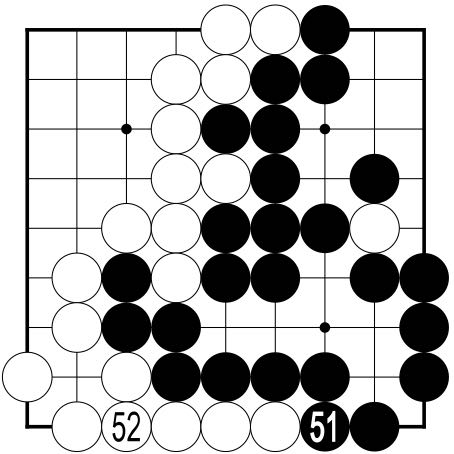 Figure 8 (51-52)
| |
The result of the gameAt the end of the game, any hopeless strings are removed from the board. This results in the position shown in Figure 9.There are 18 vacant intersections inside Black's territory, and Black has taken 8 prisoners altogether, including one when White passed, making a total of 26 points. White's total is only 21, made up of 19 points of territory and 2 prisoners including one when Black passed, so Black has won the game on the board by 5 points. If komi were 7 points then White would win the game by 2 points.
| 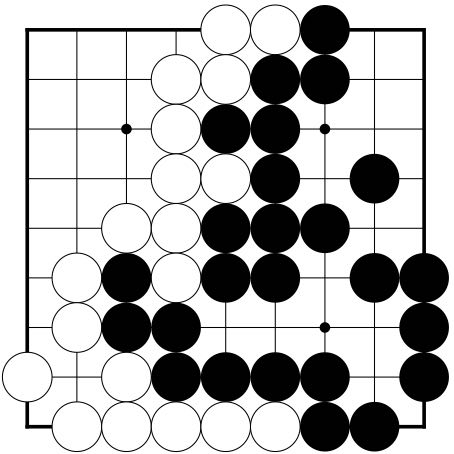 Figure 9
 Hopeless strings removed | |
The result of the game - Fill-in Method
|
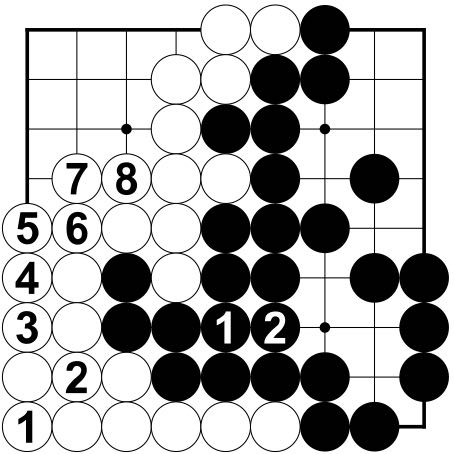 Figure 10
 Prisoners replaced | |
|
The scores in Figure 11 are the result of each player subtracting from the value of the opponent's territory the number of prisoners captured, rather than adding them to their own total; but the end result is the same: Black wins by 5 points. If komi were 7 points then White would win the game by 2 points. | 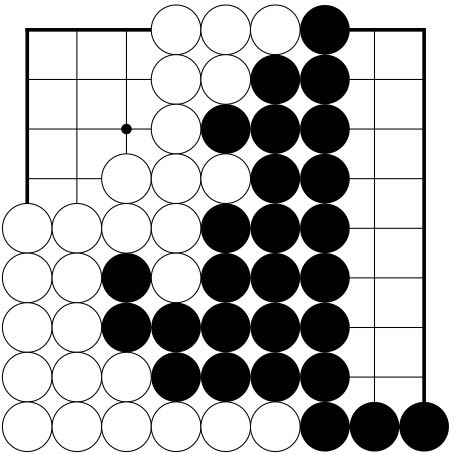 Figure 11
 Territories re-arranged | |
|
|

Next: Problems

This page is part of the online version of our Play Go Leaflet.
If you have any comments, please email the webmaster on web-master AT britgo DOT org.